Hide, Delete, Remove or Destroy the Recycle Bin Icon from Desktop in Windows 8, Windows 7 or Vista

How to Hide, Delete, Remove or Destroy the Recycle Bin Icon from Desktop in Windows 8, Windows 7 or Vista? You can remove or delete Recycle Bin Icon from Desktop simply following below steps:


Deleting in Vista


Just right-click on the icon and select delete from the menu.


Deleting in Windows 8 and 7


1. Right-click on the desktop, choose Personalize


2. Then choose Change desktop icon settings on the left-hand side.


3. Then simply remove the check from the Recycle Bin box:


4. Then Apply and Ok. You are done.

How to Change System Sounds Scheme in Windows 8


How to Change System Sounds Scheme in Windows 8? Windows 8 allows assigning sounds that will play when certain events occur on your computer. An event can be an action that you perform, such as logging on to your computer, or an action that your computer performs, such as alerting you when you receive new e‑mail. Windows comes with several sound schemes (a collection of related sounds) for common events. Follow the below given step by step procedure to access Windows sound settings.


1. First, from Metro Start screen search option, type: Control panel and press Enter. Than click Control panel. In the control panel items, select Hardware and sound.


2. From hardware and sound list, click and open Change system sounds, which is displayed under the SOUND.


3. Sound settings window pops up will come, where you can see list of options change the sound scheme, select different sounds for Windows events and uncheck Play Windows Startup sound to disable it.


4. Now to change a system event sound, select and event, here I’ve chosen Program Error from the program event list, now as you can see in the sounds tab, it shows none which means the sound alert for this particular event is not set. To select a sound for this event, click on the dropdown arrow and you have a list of tones, select and then TEST to check if it suits or not, ensure to click on apply and OK for the changes to take effect.


You are done. Stay with us to get update.

How to Shrink Hard Disk Volume or Create Hard Disk Partition in Windows 8


How to Shrink Hard Disk Volume or Create Hard Disk Partition in Windows 8? Want to Create Hard Disk Partition in Windows 8? Don't worry here I show how to easily shrink or decrease the size of your hard drive space, in other words it is also called as partition of hard disk space. Just follow me:-


1. First, from Metro Start screen search option, type: Disk partition and press Enter. Than click Create and format hard disk partitions.


2. Now Disk Management Windows is open, you can see all the drives of your system below. Here for example I’ve chosen my C: drive, now right click on the drive which you want to shrink, select Shrink volume….


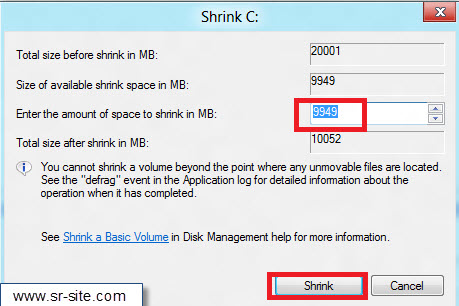
3. A pop up window will come. In the pop up shrink C: window, enter the amount of space you wish to shrink in MB’s and click on shrink.


4. Just Wait few seconds and you can see a new unallocated space adjacent from the C: drive, which can be used as new partition.


That's all and you are done. Here you can see How to Customize or Change Recycle Bin Settings in Windows 8 If you need.

How to Customize or Change Recycle Bin Settings in Windows 8


How to Customize or Change Recycle Bin Settings in Windows 8? If you want to customize Recycle Bin Settings in Windows 8 in windows 8 you have to make some changes. Basically the Recycle Bin stores data that has been deleted from your system. The Recycle Bin Settings in Windows 8 helps a user to recover the data if necessary. This article explains how to customize the Recycle Bin Settings in Windows 8. Just follow the below steps:-


1. From desktop, right click on Recycle bin select properties.


2. The Recycle Bin Property Window will be open and in this window. To assign maximum storage or to increase the recycle bin storage memory in MB’s, enter the number of MB’s in ‘Maximum size box’ as shown below.


3. Here, you have to enable the option to immediately remove files when deleting without storing them in the Recycle Bin. You can check the box next to Don't move files to Recycle Bin.


Note: Click on the check of confirmation dialogue box before you click on delete option. After you have made the changes ensure to click on Apply and OK.

How To Remove Link from Site Header in Blogger


How To Remove Link from Site Header in Blogger? Most of blogger templates has hyperlink Site Header. If you want remove link from Site Header you have to follow below steps:-


1. Login to your blogger account.


2. Than dashboard >> layout >> Edit HTML.


3. Don't forget to backup your template first.


4. Check the Expand Widget Templates box.


5. Find where you see the below code:-


<div class='titlewrapper'>

<h1 class='title'>

<b:if cond='data:blog.url == data:blog.homepageUrl'>

<data:title/>

<b:else/>

<a expr:href='data:blog.homepageUrl'><data:title/></a>

</b:if>

</h1>

</div>

6. Now Replace above code with below code.


<div class='titlewrapper'>

<h1 class='title'>

<data:title/>

</h1>

</div>

7. Save your template and you are done.

How To Remove Link from Post Titles in Blogger


How To Remove Link from Post Titles in Blogger? Most of blogger templates has hyperlink single post title. If you want remove link from post title you have to follow below steps:-

1. Login to your blogger account.


2. Than dashboard >> layout >> Edit HTML.


3. Don't forget to backup your template first.


4. Check the Expand Widget Templates box.


5. Find where you see the below code:-


<h3 class='post-title'>

<b:if cond='data:post.link'>

<a expr:href='data:post.link'><data:post.title/></a>

<b:else/>

<b:if cond='data:post.url'>

<a expr:href='data:post.url'><data:post.title/></a>

<b:else/>

<data:post.title/>

</b:if>

</h3>

</b:if>

6. Now Replace above code with below code.


<h3 class='post-title'>

<b:if cond='data:post.link'>

<a expr:href='data:post.link'><data:post.title/></a>

<b:else/>

<b:if cond='data:post.url'>

<data:post.title/>

</b:if>

</h3>

</b:if>

7. Save your template and you are done.

How to delete or Remove temporary files in Windows 8


How to delete or Remove temporary files in Windows 8? The Windows Disk Cleanup Wizard will delete your temporary files, but only if they are over a week old. Deleting temporary files reduces the number of unnecessary files which frees up disk space and helps your computer run faster and hence increases the performance, removing these files doesn’t interrupt as they are no longer useful. Here I show how to delete temporary files in Windows 8.


1. First, from Metro Start screen search option, type: disk cleanup and press Enter. Than click Free up disk space by deleting unnecessary files.


2. Disk clean up : drive selection window pops up will come. Temporary files are usually stored in drive where the OS is installed. Click on the drop down arrow and select the drive to which you have installed the Windows, now click on OK.


3. In this step Disk cleanup starts scanning and calculates the free space of selected drive.


4. Now check Temporary files and click OK to deleting these files.


5. You have to allow deleting files. Click Delete files to proceed.


6. The disk clean up utility starts removing unwanted temporary files from your system.


You are done.

How to Hide IP Address in Mozilla Firefox without Using Any Software


How to Change or hide IP Address in Mozilla Firefox without Using Any Software? Sometimes we need to change ip address for online security, as there are several websites that want your personal information. One way to protect your online privacy is to surf by changing your ip address while using websites that you don't trust. Here I show to change ip address in Mozilla Firefox without using software.To do it just follow the below steps :-

1. Click on Tools and then click on Options.


2. Click on Advanced button at the top of pop up window


3. Now choose Network tab and go to Connection settings.


4. Click on Manual proxy configuration radio button.


5. Now set the HTTP Proxy and Port Number.


6. Click on OK button. Now you can access the Internet with a changed ip address.


You are done.

How to Hide IP Address in Comodo Dragon without Using Software


How to change or hide ip Address in Comodo Dragon without Using Software? Sometime we need to change ip address for online security, as there are several websites that want your personal information. One way to protect your online privacy is to surf by changing your ip address while using websites that you don't trust. Here I show to change ip address in Comodo Dragon without using software. To do it just follow the below steps :-


1. Click the Comodo Dragon Logo on the top off left side.


2. Than select Options >> Under the Hood >> Network.


3. Check Use this proxy server and keep IP Address with port.


4. You are done. Here you can see How to Change IP Address in Firefox, Internet Explorer and Mac's Safari If you need.

How to Hide IP Address in Firefox, Internet Explorer and Mac's Safari without Using Software


How to Change or hide IP Address in Firefox, Internet Explorer and Mac's Safari? If you surf the Internet frequently, then you need some online security, as there are several websites that want your personal information. One way to protect your online privacy is to surf by changing your ip address while using websites that you don't trust. Here you can get the methods to change your ip address in Windows XP, Vista, 7, and Mac, using the popular browsers Mozilla Firefox Internet Explorer and Mac Safari.


Change IP Address in Firefox:


1. Click on Tools and then click on Options.


2. Click on Advanced button at the top of pop up window


3. Now choose Network tab and go to Connection settings.


4. Click on Manual proxy configuration radio button.


5. Now set the HTTP Proxy and Port Number.


6. Click on OK button. Now you can access the Internet with a changed ip address.


Change IP Address in Internet Explorer:


1. Go to Internet Options under the Tools menu.


2. Click on Connections tab.


3. If you use a dial up connection, select currently active connection and click on Settings button.


4. Check the check box labeled Use a proxy server for this connection.


5. Fill the IP address and Port number and click on OK button.


6. If you use cable or DSL, click on the LAN Settings button, and repeat step 4 and 5 for that connection.


7. Click the OK button to finish. Now feel free to surf anonymously with changed ip address.


Change Your IP Address in Mac's Safari:


1. Go to Edit and click on Preferences.


2. Click on Advanced button.


3. Click on Change Settings button which is just next to label Proxies.


4. For dial up connections, select the Internet connection for which you want to change your ip address


5. Click on settings.


6. Click on the check box labeled Use a proxy for this connection and enter proxy port and ip address in text boxes.


7. Click on OK button to change your ip address with anonymous proxy ip address.


8. For LAN Connections, you need to click on LAN Settings Button after step 3, and enter anonymous proxy ip and port as in ster 6 and 7.


Your IP Address has successfully change.

How to Hide IP Address in Google Chrome without Using Software


How to change or hide ip Address in Google Chrome without Using Software? Sometime we need to change ip address for online security, as there are several websites that want your personal information. One way to protect your online privacy is to surf by changing your ip address while using websites that you don't trust. Here I show to change ip address in Google Chrome without using software. To do it just follow the below steps :-


1. Open Google Chrome. Click the Tools button on the task bar (icon of a spanner), and then click Options. Click the Under the hood tab to launch advanced settings.


2. Click Change proxy settings, from the Connections button click LAN settings.


3. Click Use a proxy server for your LAN and then enter the IP address of your proxy server into Address and the Port to your given port address. Click OK, and then OK again to finish setting up a proxy.


You are done.Here you can see how to change ip Address in Comodo Dragon if you need.

Choose or Select Another Operating System while Using Windows 8


How to choose or select another operating system when you are using Windows 8? If you have more than one operating system in their computer with windows 8 and you want choose another operating system while running window 8 you have follow below steps to select a another operating system.


1. First, from Metro Start screen search option, type: advanced startup and press Enter. Than click Advanced startup options.


2. From the Advanced startup click Restart now.


3. Now Click on Use another operating system to get access to another operating system.


4. Now you can choose another operating system if you have. Here you can also change the default OS setting by clicking on Change defaults.


It's all. Here you can check the usage details of memory in windows 8.

How to Check the Usage Details of Memory in Windows 8


How to Check or verify the Usage Details of Memory in Windows 8? Do you want to check or verify your computer memory details in windows 8 operating system? Most of the users will be curious to get detailed information about memory usage. Here I wish to show how to verify Usage Details of Memory in Windows 8.


1. First, from Metro Start screen search option, type: performance and press Enter. Than click Performance Information and Tools option.


2. From Performance Information and Tools window click Advanced tools option.


3. In the Advanced tools window to check memory details, click on the tool Open Resource Monitor.


4. Now you can see the Resource Monitor window, select the Memory tab to get a detailed memory (RAM) usage on your PC.


It's all ok. Here you can see how to use or go back the old boot manager interface in Windows 8 If you need.

How to add or Remove Run Command Line On Start Menu in Windows 7


How to add or Remove Run Command Line On Start Menu in Windows 7? If you want to add Run Command Line add your windows 7 start menu you have to do some change start menu settings as mentioned below.


1. Right click on Start button and Click on Properties.


2. From the Start Menu tab click on Customize button.


3. A new window will come, scroll down to the end and find Run command.


4. Check Run command button and click on OK.


5. Than back to Taskbar and Start Menu properties window. Click on Apply and Ok. You are done.


6. If you want to remove Run Command Line from Start Manu just uncheck Run command button and click on OK. Than back to Taskbar and Start Menu properties window. Click on Apply and Ok. You are done.


How To Enable or Add the BCC Field in Outlook 2010


How To Enable or Add the BCC (Blind Carbon Copy) Field in Outlook 2010? If you want to send an email for several contacts, you might want to keep some of the recipient email addresses private using the BCC Field. Here I wish to show how to do it....


1. Open Outlook 2010 and Compose a new Email which you want to send.


2. Than Click the Options tab.


3. Click the BCC button.


4. All done. The field is now turned on and ready to use to blind carbon copy recipients.


Here you can see the way of Changing The Default Color Scheme In Office 2010 in My Computer of you want.

How to Add or Include Hibernate Button to the Windows 8 Power Option


How to Add or Include Hibernate Button to the Windows 8 Power Option? Hibernate is one of the important feature in windows power options. But it is unavailable in widows 8 power option. If you want to add or include Hibernate Button you have do it from power option. Here I wish to show it.


From the Metro Start screen, use the keyboard shortcut Windows Key + W and type power options. From the results click Change What the Power Buttons Do.


System Settings will open. From the System Settings window click Change Settings that Are Currently Unavailable.


Now scroll down and from the Shutdown Settings check the Hibernate box. Click Save Changes.


Close out the windows of System Settings and press the Windows Key to return to the Metro Start screen. Now click the Power button and Hibernate is successfully listed to your windows 8 power option.


You can see How to View and Manage All Installed Programs in Windows 8 if you need.